.svg)

Webflow is on the rise and has become one of the most popular website editors on the market, sharing many advantages as Wix and in some areas, one might even say Webflow surpasses it.
Webflow offers customization beyond any other competitor and allows its users to create wonderful websites with complete freedom. Thanks to its easy-to-use interface and integration of more advanced features (which we will get into later), Webflow allows both veteran and novice website builders to do web development with no difficulty at all. Webflow offers more experienced website builders an extra layer of customization by allowing them to dive right into the website's code and create fluid animations. Webflow's content management system is also extremely powerful, allowing users to update website contents easily.
Webflow is also the go-to choice for our team at Media Studio Hong Kong to create effective landing pages and beautiful web design.
Today, we are here to guide you through the makings of a Webflow site. In this Webflow tutorial, we will show you how to build your very own custom website on Webflow using 7 simple steps.
Step 1: Sign up on Webflow
By following this link here, you will find yourself at Webflow’s website. To make a website on Webflow, you will first have to make your account. Press the button shown in this picture to create your account (users can choose to sign up with their email account, or connect with their Google account).

Step 2: Understanding the Box Model
We know you would love to get started with Webflow as soon as possible, but before you do, there is a concept that you first have to understand: The Box Model.
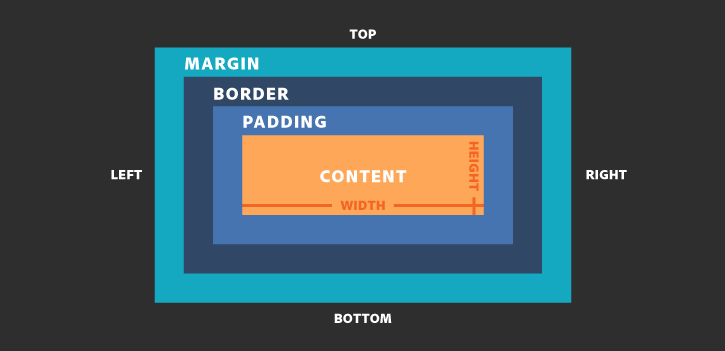
The layout of all websites is made of boxes inside boxes inside boxes, the boxes have different sizes, spacing, and grids. They help you organize the content (such as images, text, videos, and buttons) of the websites by allowing you to neatly sort the content inside the boxes. For example, inside a blank page one could put a section, inside which you may place a container, then columns and rows inside the containers for different text and images. The size, borders, margins, paddings, and positions of the boxes determine the layout of the website and where all your content goes. For example, to shift a button from the left to the right, one would add more margin to the left side of the button instead of dragging the item to your desired location like one would in Wix or PowerPoint.
Do you understand this concept? If you do, congratulations! You have already learned the hardest part of web design on Webflow.
If you are still confused about this concept, don't worry, you can follow this fantastic Webflow beginner's tutorial by Timothy Ricks to better understand this concept of web design.
Step 3: Starting a new project
Webflow will now take you to a project with a layout for you to start editing. However, we would like to go just a little more in-depth in this tutorial, so we would like to ask you to click on the “Dashboard” button on the top left-hand corner.

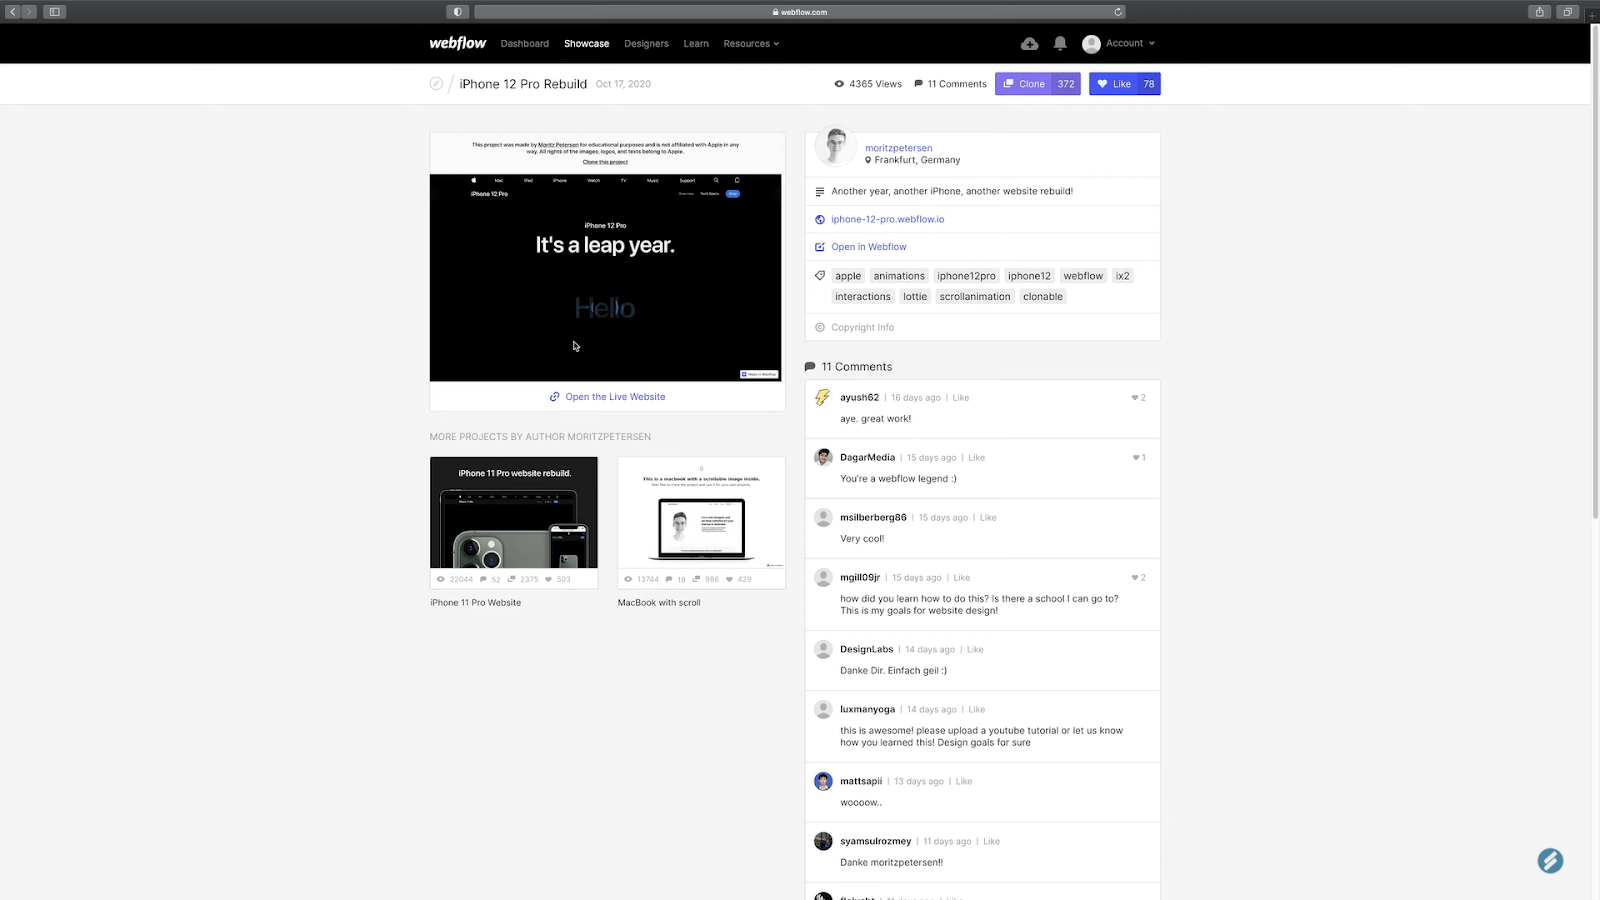
You will now be taken to your dashboards, which contain all the projects you have made in Webflow. Right now, you should see only one project, the one that Webflow started for you. By clicking “Showcase”, you can see designs from other web designers and make a copy of them by pressing “Clone” if you would like.
Now, by clicking “Dashboard” on the top bar, you will be taken back to your dashboard, then, press “New Project” to start a project of your very own.

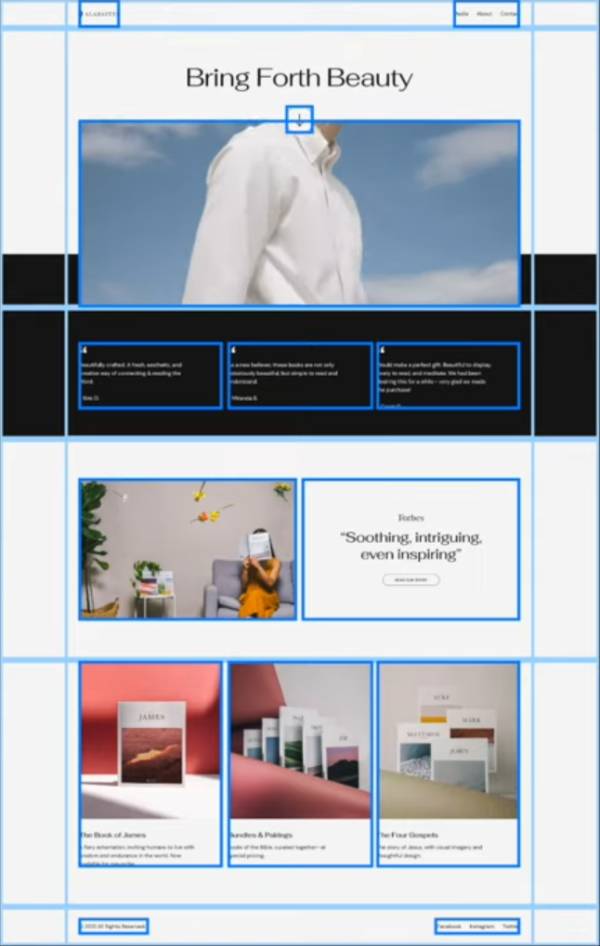
Once you've clicked “New Project”, you will be taken to a page where you can choose from different templates, upon which you can make edits. Webflow offers more than 500 templates for its users, but not all of them are free. Hover over the template you want and click “Select”, then give your new project a name and click “Create Project”.
Step 4: Understanding the Editor
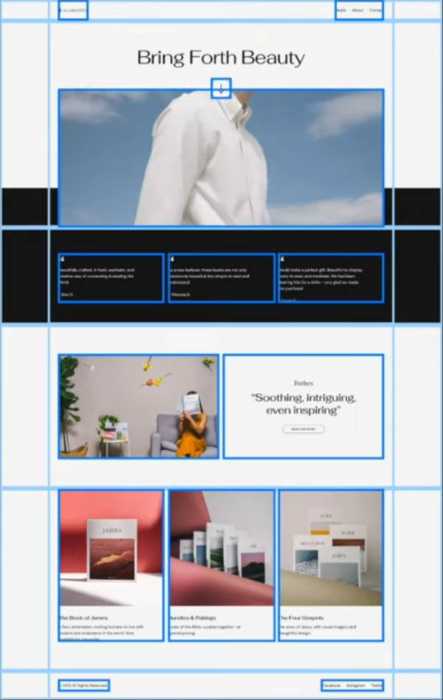
The editor in Webflow has a three-sided layout.

The bar on the left contains page navigation, content navigation (which allows you to select the exact “boxes” that you want to edit since a complicated site will have many “boxes” and clicking on the exact one you want with a mouse can be hard) and content such as images and videos that you have uploaded, and containers, sections, and boxes that you can use to organize your site.
The bar on top allows you to switch between desktop, tablet, mobile landscape, and mobile portrait mode and allows you to save and publish your site.
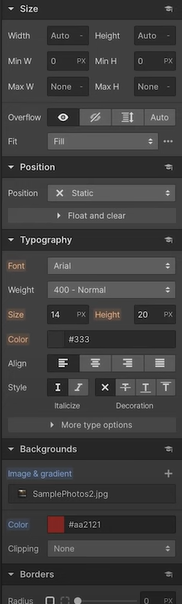
The bar on the right allows you to edit the elements on your site, all settings from image size, position, margins, paddings, fonts, and color are found here.
Step 5: Edit text, images, and backgrounds
Now that you have gained an understanding of the layout of Webflow, it is time to start editing! To edit text double click the desired text (or find it using the navigation menu on the left) and type in something new. You can also add new text boxes by dragging and dropping a text box from the “Add” menu into your desired container.

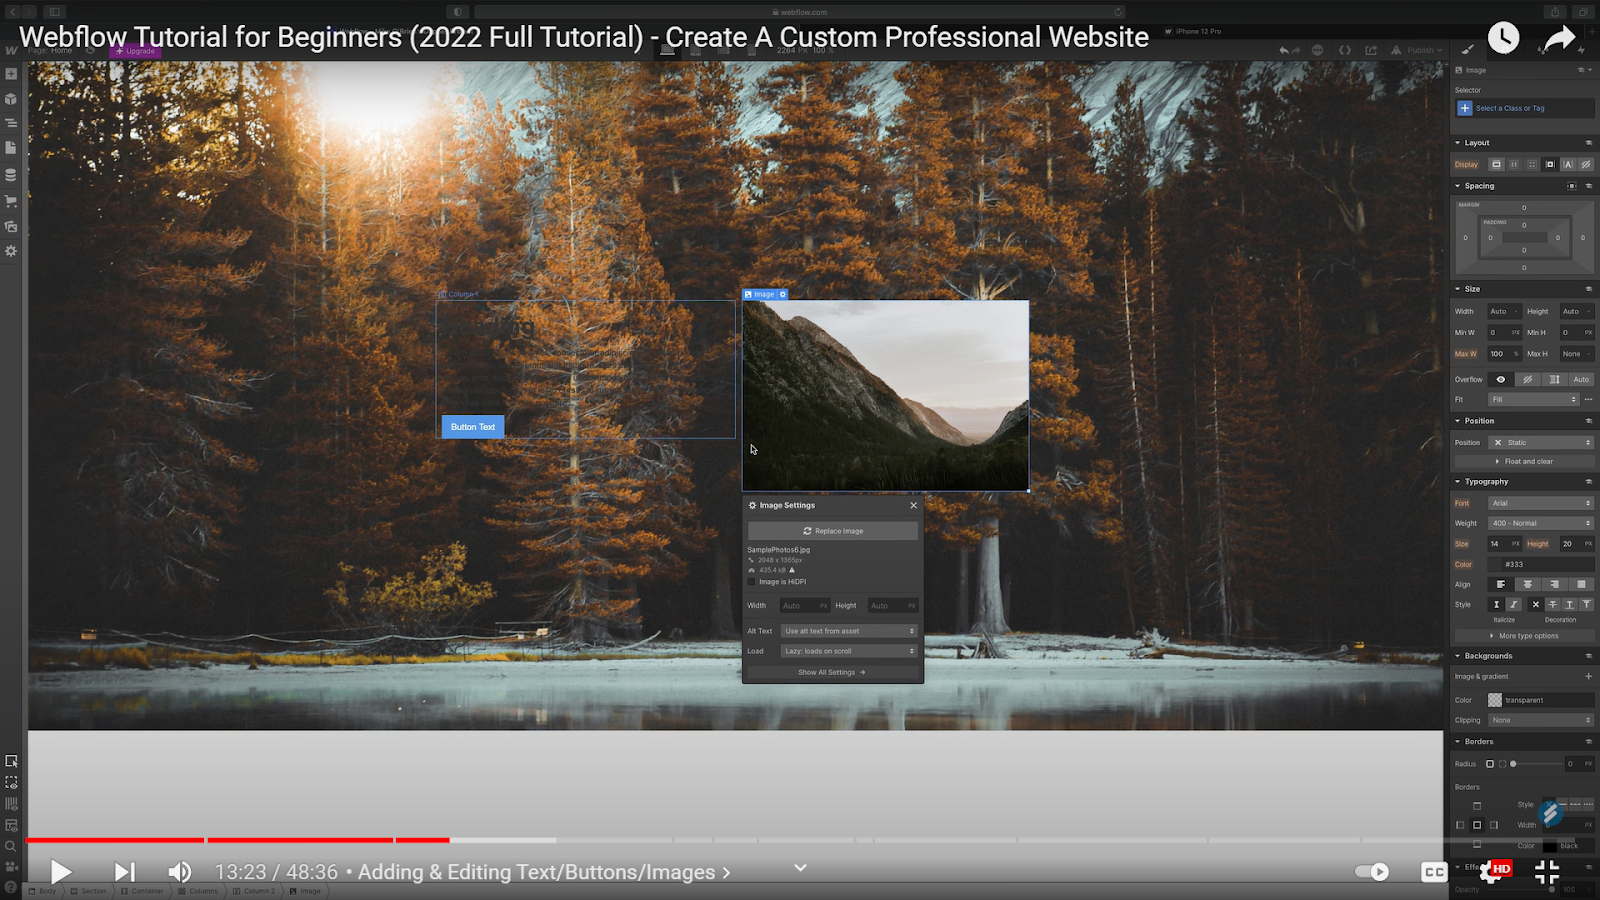
To edit an image, click on your desired image or locate it using the navigation menu. Then, click on the Settings icon on its tag and press “Replace Image”.
To edit a background, click on, or locate your desired container. Then adjust its color or gradient or even fill it with an image using the bar on the right at the backgrounds tab.
Step 6: Editing the mobile version
By now, you should have adjusted your Webflow website to your liking, there is only one last step to go! Since mobile users account for more than 54% of all internet users, having a mobile-friendly website or landing page is absolutely essential for your website’s success! Having a bad website on mobile will deter more than half your visitors.
To edit the mobile version, simply click the mobile icon located on the top bar of the editor. There is a tablet, mobile landscape, and mobile portrait mode.
.jpeg)
All settings applied to the main mode will be applied progressively to the left, but not vice versa, which means that all settings in the desktop mode will be applied to every mode on the right, but adjustments made on say, the tablet mode, will not be applied to the desktop mode.
Step 7: Publish your new landing page
To publish your website with a custom domain, you will need to purchase a subscription plan on Webflow. Fortunately, Webflow’s pricing plans are all very affordable. To upgrade your site, click on the “W” icon on the top left corner and select “Project Settings”, then go to the “Hostings” tab to choose a plan.
Webflow continuously autosaves your site, so you never have to worry about losing progress. To see if your changes have been saved, simply look at the green tick on the right of the top bar. To publish your site, simply press “Publish to Selected Domains”.

If you would like to save on costs, the starter plan (which you are currently using) is free and allows users to publish up to 2 projects on a branded domain name which looks like this: projectname.webflow.io and with a branding badge similar to what you would find on a free Wix site, but smaller and at the bottom right-hand corner.
Pro tip: if you are a student or an educator, you are eligible to sign up for a CMS site plan and publish with a custom domain - completely free of charge! Click here to learn more about this plan.
Conclusion
And there you go! That was 7 simple steps on setting up your first Webflow site. Stay tuned to our future blogs to get more free tutorials and web-related tips!
If Webflow turns out to be too complicated, Wix could be a better choice! Be sure to check out our guide on getting started with Wix.
If you need more motivation and reasons to not use WordPress, check out why we opt to use just about anything to avoid using WordPress.
前言
看看架站平台趨勢,Webflow 已成為市場上最受歡迎的網站架設和設計平台之一,和 Wix 一樣深受國外設計師的重用。然而,Webflow 比起 Wix 在某些功能上具有許多優勢。論網站架構的自由度,可以說 Webflow 已經遠遠超越了。
再談到Webflow設計功能的話,如果說Webflow的設計編輯器排名第二,那沒有哪個平台的設計編輯器敢稱它們的設計編程器排名第一。
Webflow 的設計編輯器提供比任何其他競爭對手更多的定制功能,並允許其用戶完全自由地設計網站。由於 Webflow 擁有易於使用的界面和更進階功能的挑選(我們將稍後介紹),而且教學資源豐富,Webflow 讓資深和新手網站建設者都能輕鬆設計網站。 Webflow 更為資深使用者提供了強大額外的定制功能,允許他們直接編輯網站的code,而且具備網頁動畫工具(Interactions)和內容管理系統(Content Management System/CMS)。
基於上述原因,在 Media Studio Hong Kong 的網頁設計師們都較喜歡使用 Webflow 來做網頁設計及開發,亦啟發我們在此推薦神器。
今天,我們在這裡指導您如何設計自己的 Webflow 網頁。在本教程中,我們將向您展示如何使用 7 個簡單的步驟在 Webflow 上設計出屬於您自己的第一個網頁頁面。
第 1 步:註冊
通過點擊此處的此鏈接,您將會到達 Webflow 的網站。要在 Webflow 上創建網站,您首先必須創建自己的帳戶。
按此圖片中顯示的按鈕創建您的帳戶(用戶可以挑選使用自己的電子郵件帳戶註冊,或連接到他們的 Google 帳戶)。
第 2 步:了解盒子概念
我們知道您想盡快開始使用 Webflow,但在您開始之前,您首先必須了解一個概念:盒子概念。
所有網站的佈局都是由盒子所組成的,盒子有不同的大小、厚度、間距和網格。它們讓用家對框中的內容進行排序,從而讓您組織網站的內容(例如圖像、文本、視頻和按鈕)。例如,在空白頁內可以進行分隔,您可以在其中放置一個容器,然後在容器內放置不同的文本和圖像。框的大小、邊框、邊距、填充和位置決定網站的佈局以及所有內容的去向。
例如,要將按鈕從左向右移動,可以在按鈕的左側添加更多邊距,把按鈕推向右邊。而不是像在 Wix 或 PowerPoint 中那樣將項目拖動到所需位置。
你明白這個概念嗎?如果明白的話,恭喜你!您已經學習了在Webflow裏設計網頁中最難的部分。
如果你還不算是非常了解這個基礎網頁設計概念,可以試試跟著這個 Webflow 網站架構教學影片來以實戰增加對於網頁設計的認知。
第 3 步:開始一個新項目
Webflow 現在將帶您進入一個帶有佈局的項目,供您開始編輯。但是,我們想在本教程中更深入一點,所以我們想請您單擊左上角的 “Dashboard” 按鈕。
您現在將被帶到您的 Dashboard,這裏顯示了您在 Webflow 中創建的所有項目。現在,您應該只看到一個項目。點擊 “Showcase” 就可以查看其他網頁設計師的設計,如果您有興趣看看該網站的架構,可以按 “Clone” 複製它們。
點擊頂部欄上的 “Dashboard”,您會被帶回儀表板,然後,按“New Project”開始您自己的項目。
單擊 “New Project” 後,您將被帶到一個頁面,您可以在這裏選擇及編輯不同的模板。 Webflow 為用戶提供了 500 多個模板或佈景主題,但不是所有模板都是免費的。請將鼠標懸停在您想要的模板上並單擊 “Select”,然後為您的新項目命名並單擊 “Create Project”。
第 4 步:了解編輯器
Webflow 中的編輯器具有三邊佈局。
左側的欄包含頁面導航、內容導航(它允許您挑選您想要要編輯的 “框”,因為一個複雜的站點將有許多 “框” 而且用鼠標單擊您想要的那一個框很比較困難)和您上傳的圖像和視頻等內容,以及可用於組織網站的容器和框。
頂部的欄允許您在桌面、平板電腦、手機橫屏和手機豎屏模式之間切換,並允許您保存和發布您的網頁。
右側的欄允許您編輯網頁上的元素。圖像大小、位置、邊距、填充、字體和顏色的所有設置都可以在此處找到。
第 5 步:編輯文本、圖像和背景
現在您已經了解了 Webflow 上的佈局,是時候開始編輯了!
要編輯文本,請雙擊所需文本(或者,使用左側的導航菜單找到它)並輸入新內容。您還可以通過將文本框從 “Add” 菜單拖放到所需的容器中來添加新的文本框。
要編輯圖像的話,請單擊所需的圖像或使用導航菜單找到它。然後,單擊其標籤上的設置圖標,然後按 “Replace Image”。
.jpeg)
要編輯背景,請先單擊或找到所需的容器。然後調整其顏色或漸變色,或者使用右側的欄(“background”)填充圖像。
第 6 步:編輯移動版本
到目前為止,您應該已經根據自己的喜好設計調整了 Webflow 網站,只剩下最後一步了!
由於移動用戶佔所有互聯網用戶的 54% 以上,擁有一個適合移動設備的網站對於您網站的成功至關重要!在移動設備上擁有一個不好的網站會令您失去一半以上的訪問者。
要編輯移動版本,只需單擊位於編輯器頂部欄的圖標。有平板、手機橫屏和手機豎屏模式。
.jpeg)
應用於主版本的所有設置將應用於其他版本,但是其他版本上的設置不會應用於主版本。
第 7 步:發布網站
要使用自己的網域發布您的網站,您需要在 Webflow 上購買 Site plan。Webflow 的Site plan 都比較實惠。要升級您的站點,請單擊左上角的 “W” 圖標並選擇 “Project Settings”,然後按 “Hosting” 選擇一個 Site plan。
Webflow 擁有多種付費方案可以選擇,您可以根據您的需求來挑選合適的 Site plan。請注意 Webflow 的方案有 Site plan 和 Account plan 之分別,購買時別選錯。
如果您想節省成本的話,入門計劃(您當前正在使用)是免費,並允許用戶在Webflow品牌域名(www.webflow.io)上發布最多 2 個項目。
Webflow 不斷自動保存您的網站,所以您永遠不必擔心失去進度。要查看您的更改是否已保存,只需查看頂部欄右側的綠色勾號。要發布您的網站,只需按 “Publish to Selected Domains”。發佈後,任何瀏覽者就能使用該連結來拜訪你的新網站!
提示:如果您是學生或教育工作者,您即可享用一個免費的 CMS site plan 並使用您自己的域名發布網站 ! 單擊此處了解有關此計劃的免費教育版 Webflow 方案。
Webflow University / Webflow 大學
如果你想參考更多 Webflow 官方教學影片的話,我們推薦到 Webflow University 網頁去看下。
是 Webflow 專門為想學習 Webflow 的學生們創建的網頁。網頁有許多使用 Webflow 的專業設計師們錄製的官方 Webflow 教學影片,詳細解釋 Webflow 的操作過程。這些教學影片非常值得一看。
而且站內的所有官方 Webflow 教學都是免費的。
Webflow 的教學總結

這是設置您的第一個 Webflow 網站的 7 個簡單步驟。我們希望這篇 Webflow 教學文章讓您對 Webflow 工具及操作頁面有所了解。
請繼續關注我們未來的部落格,以獲取更多免費Webflow教學和其它網絡相關教學和提示!
要想盡快入門Webflow的話,您還是要有一定HTML CSS 基礎功底的。如果您對 HTML CSS 很熟悉的話,那快速入門 Webflow 就會非常容易,可能只需一兩個Webflow 教學影片,了解操作邏輯就足夠了。
如果您對HTML CSS 不太熟悉,我們建議參考一下這個網站,有非常全面的網頁製作教學文章。
雖然我們在前言裡說到 Webflow 是當前設計網頁最好的選擇,但是如果您覺得 Webflow 太複雜或者看了許多教學而還是搞不懂,Wix 可能是更好的平台,畢竟Wix操作頁面比 Webflow 是更加簡單清晰!別忘了看我們的 Wix 入門指南。我們也歡迎您隨時把任何 Webflow 問題發給我們,我們的網頁設計師會盡量幫助你。
如果您需要更多不學習 WordPress 的動力和理由,請查看為什麼我們選擇使用任何方法來避免使用 WordPress。

Ex Silicon Valley full-stack developer. Web designer, SEO expert, and co-founder of Media Studio Hong Kong.


.webp)